In order to move your Office installation to a different computer, you need to meet the following three conditions:
You need to own the 25 character Product key that was given to you when you purchased the license.Your license type needs to be transferable. Only “retail” and “FPP” license types are transferable.An installation media (disk or file) for Office that matches your Product key.
Note: Keep in mind that the above conditions don’t apply to the new Office 365 subscriptions or to Office 2016. Lately, Microsoft has been associating licenses with the client’s email account (not with the hardware). You can move it easily via the MyAccount page (here). You can navigate to the bottom of the article for detailed steps on how to manage your Office 365 / Office 2016 subscription. Now back to the old way of transferring an Office installation. Microsoft has sold a lot of different Office license types over the years. Before Microsoft linked the license to the user’s email account, it was a pain to figure out which license you owned. And it still is, as you’ll come to see in a moment. Below you have 3 important steps that will help you determine whether you’re able to move your Office license to a new computer or not. Please go through with them and see whether you’re eligible to migrate your license to a new computer. If all is in order, you can then proceed with the guide on transferring your Office license. Note: As stated above, the following steps only apply to Office 2010 and Office 2013 licenses. If you own an Office 365 or an Office 2016 license, you can skip the three steps below, as your license is definitely transferable.
Step 1: Identify your Office license type
Before we go over the license types, there one thing you need to understand about the Microsoft Office licenses. When you buy the license, it does not mean that you own it and can do with it as you please. The license terms state clearly that you are leasing the Office software. This is why all of them come with quite a few of restrictions, as you’ll see in Step 2 and Step 3. Here’s a shortlist of the most popular Office license types:
FPP (Full Product Pack) – Most popular license type, usually sold in a plastic yellow box. Can also be bought online.HUP (Home Use Program) – Another variation of the FPP type, it’s usually cheaper but hard to get.OEM (Original Equipment Manufacturer) – This license type is installed by default on some computers. It’s not available on CD physical phisical media.PKC (Product Key Card) – PKCs are usually sold online or in stores in a card-like format (can’t be brought on CD).POSA (Point of Sale Activation) – These are usually obtained from online stores and a few other retail stores. They include a product key but no installation media.ACADEMIC – Previously sold for secondary education students. The program has since been discontinued.ESD (Electronic Software Download) – Exclusive electronic software that is only obtained from online stores and retail shops. They include a product key but no installation media.NFR (Not For Resale) – These licenses are usually given away for promotional reasons (as prizes, participation rewards, etc.)
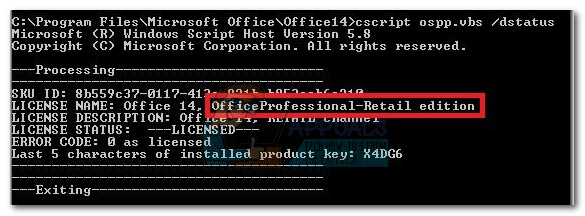
Out of all these Office license types, only FPP, HUP, PKC, POSA, and ESD can be moved to another computer. Here’s a quick guide to checking if your license is movable: If you determined that your license is transferable, move over to Step 2.
Step 2: Verify the number of concurrent installations allowed
Most Office license types will only allow one installation on one computer. Back when Microsoft was pushing hard to get ahead the other Office competitors, all retail licenses included the right to install Office on a second computer. In addition to this, the “Home and Student” bundle used to allow users to activate the license on 3 different computers in the home. With this mind, if you have an Office 2010 license, you might be able to install it on another computer without the need to transfer the license. However, starting with Office 2013, the number of concurrent installations has been reduced to 1 for all Retail bundles.
Step 3: Verify your right to transfer the license
If you only have one concurrent installation at your disposal, you likely have the option to transfer the license from one computer to another. I said likely because this is only true for retail licenses. For all the other license types, the license is bound to die along with the hardware and cannot be moved. Please consult this link (here) for additional information about installations and transferability rights. Once you confirm your right to transfer the license, move to the guide bellow associated with your Office version.
How to Transfer an Office 2010 / Office 2013 license
Every Office installation has two different steps that go hand in hand. The first part involves going through the configuration setup required in order to run the Office programs. Once the installation is complete, you’ll need to prove to Microsoft that you are the legitimate owner of the license. This usually means typing in the Product Key in order to activate your Office suite. Note: Keep in mind that whenever you activate an Office 2010 or Office 2013 suite, the activation process will store a snapshot of your hardware. This information is later used by MS with random checkups to confirm that the program has not been moved to a new computer. Note 2: In order to complete the process of migrating your license, you’ll need to retrieve your Product Key. The Product Key can usually be found inside the container that holds the installation media. If you bought the license online, you might be able to retrieve it by checking the purchase record. There’s also a third option – there are a number of 3rd party utilities capable of extracting the Product Key from an already installed Office license. KeyFinder and ProduKey are some of the most popular options. Here’s a quick guide on how to transfer your Microsoft Office license to another computer: That’s it! You’ve successfully migrated your Office 2010 / Office 2013 installation to a new computer.
How to Transfer an Office 365 / Office 2016 license
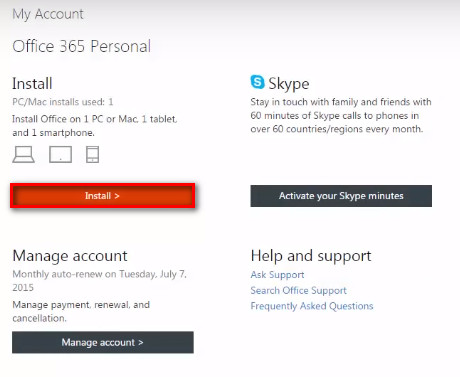
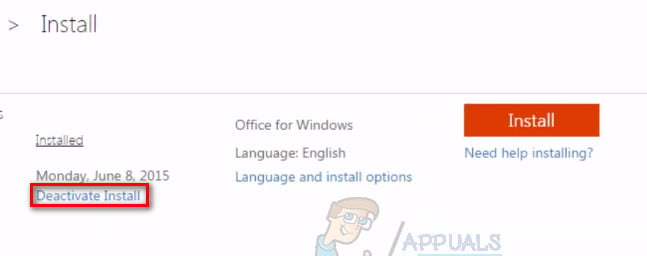
When compared to the process of moving a 2010 or 2013 license, migrating an Office 365 / Office 2016 license feels like a walk in the park. With these latest Office iterations, you’ll need to deactivate and uninstall the license of the first system before migrating it. It seems like more work, but it’s actually extremely easy. Here’s a quick guide through the whole thing: That’s it! You’ve successfully migrated your Office 365 / Office 2016 installation to a new computer.
How to Fix Error Reference Source not Found when Printing from Office 2010,…Install Microsoft Office Picture Manager in Office 2013Microsoft Office 2019 Will Be The Last Offline Productivity Suite, Users Will…Fix Microsoft Office ‘Error Code 30088-26’ when Updating Office


